
In this tutorial, I’m going to demonstrate how content created for traditional shaders can be converted to PBR shaders, how to convert content from one PBR workflow to another, and explain the various differences in modern workflows. This tutorial is intended for intermediate to advanced users, so be sure to read the previous two PBR tutorials that Jeff Russell and I wrote as the base concepts are explained in great detail and may only be briefly mentioned here.
- Basic Theory of Physically-Based Rendering – By Jeff Russell
- Physically Based Rendering, And You Can Too! – By Joe Wilson
Contents
PBR: Misconceptions and Myths
Before we get started, I want to clear a few things up. There is a lot of confusion in terms of what physically based rendering actually is, and what sort of texture inputs are required in a PBR system.
First off, using a metalness map is not a requirement of PBR systems, and using a specular map does not mean an asset is “not PBR”. I see comments about this regularly on forums, when someone sees an artist creating a specular and gloss map they often ask “Why aren’t you using PBR?”, so lets break down what PBR actually is.
PBR in the most basic sense is a combination of sophisticated shaders that represent the physics of light and matter, along with art content that is calibrated using plausible values to represent real world materials. PBR is essentially a holistic system of content creation and rendering, which can and often does have variances (generally shader models or texture input types) in actual implementation, depending on what tools or engine you use.
Additionally, loading any old content into a PBR shader does not guarantee physically accurate results. I see this misconception rearing its head equally as often as the “Why not PBR?” one mentioned above. Fancy shaders are only half of the equation, you also need logically calibrated art content.
One last thing, is it diffuse or albedo? These two terms mean essentially the same thing, the base color of an object, and are often used interchangeably.
PBR: What Has Changed?
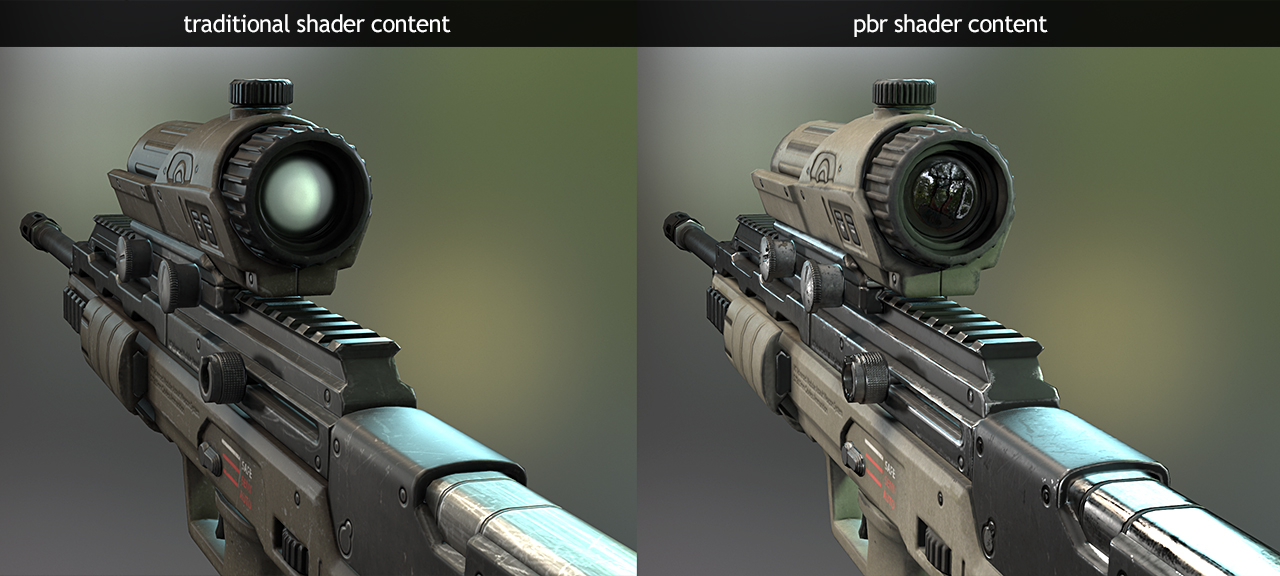
To fully understand how to create or convert content intended for PBR systems, it’s important to look at how shaders have changed. One of the biggest differences is how advanced the lighting calculations are in modern shaders. Today we have dynamic light sources that cast realistic shadows, and image-based lighting that provides accurate ambient diffuse and specular reflections. This means that we no longer have to paint lighting, reflection or shadow content directly into our textures. Now more than ever, we can focus on replicating material properties rather than baking in specific lighting conditions.
Additionally, linear space rendering means we no longer have to color specular maps the opposite color of our diffuse to get a neutral white highlight, while energy conservation in the microsurface function (rougher surfaces will have broader highlights with a dimmer appearance as the light is dissipated over a larger area) removes the need to manually make rough areas dark and glossy areas bright in the spec map. This means specular maps will generally contain little more than flat values (greyscale for insulators, colored for some metals) for each material type, while microsurface maps should define most of the surface variation.
Traditional Content Recap
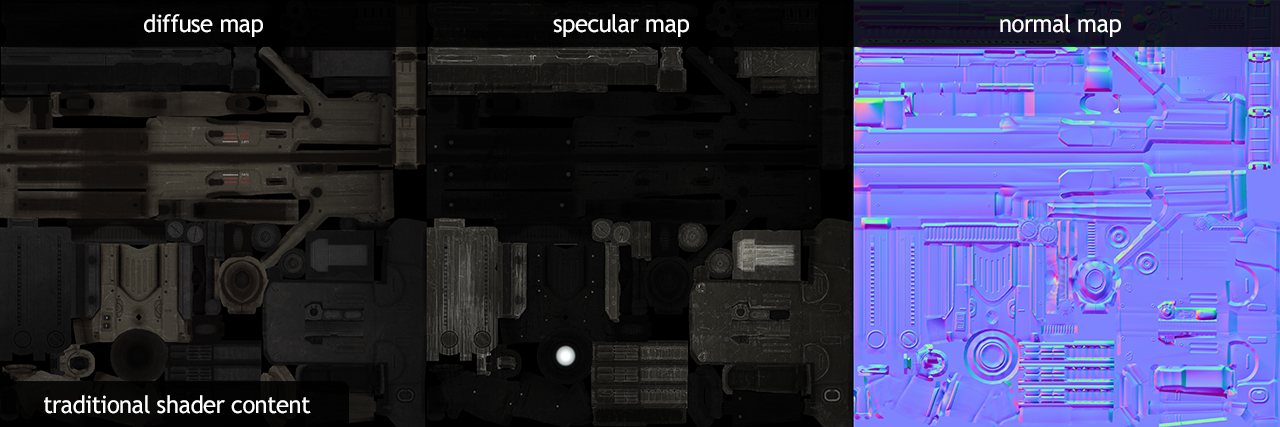
To show the difference between traditional and modern shaders, I’m using a gun that I created for Darkest of Days. This asset is a great example because it showcases a lot of techniques that I typically wouldn’t use in a PBR pipeline, for instance:
- The diffuse is too dark, this was likely tweaked to look good in a specific lighting environment, a big no-no.
- Ambient occlusion and cavity detail is baked directly into both the diffuse and specular map. AO/cavity content should be added via a separate input so the shader can use them in a more intelligent way. Additionally, large scale AO should not be added directly to the specular pass, as occluded light isn’t the same thing as a less reflective surface – that’s what the specular map defines.
- A gradient map is baked into the diffuse and specular map as well. Gradient maps can be handy tools to create masks for localized effects (eg, dirt on the lower areas of a character); however, they shouldn’t be multiplied directly on your texture.
- The shader this asset originally used didn’t support gloss maps. This means the specular map had to do double duty trying to represent both reflectivity and microsurface, while using a uniform glossiness value for the entire material.
- The specular values were set up by eye, rather than accounting for real world material properties. As a result, the black painted metal is too reflective, and has a slight yellow tint for no apparent reason, while the plastic and rubber materials are not reflective enough.
Texture Conversion: Traditional -> PBR Specular
Now that we understand the common differences between traditional and PBR shaders, we can update the content to work in a physically based specular workflow.
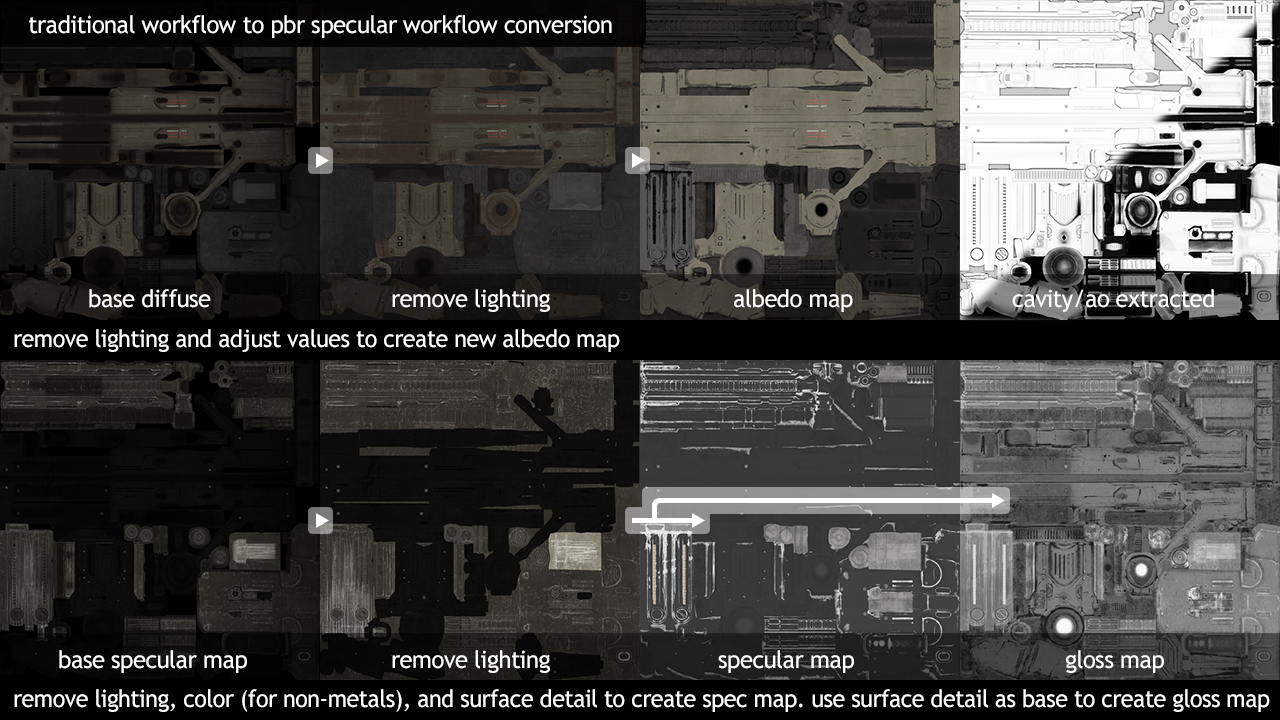
First off, I removed all of the baked lighting and gradient content from the albedo and specular maps. The AO and cavity content was moved to two separate textures and hooked up in the appropriate slot in the shader. After that, I brightened the diffuse map to a more reasonable value.
From there, I split the specular content into a gloss map and a specular map. I moved all of the surface variation from old specular map into the newly created gloss map and updated the base values to represent the microsurface structure of each material. If you already have a gloss map, you should double check your values and make sure they make sense. For instance, the underlying raw metal on a rifle would generally be smoother/glossier than the matte finish of the coating, while scratches in the finish of a glossy paint may reveal the primer below which would be rougher.
With most of the texture variation moved from the spec map to the gloss, we can focus on the reflectivity values. At this this point it’s very important to identify what is and is not metal (yes, even if you’re not using the metalness workflow). The reason for this is simple, insulators tend to have uncolored reflectance values around 4% linear (or #383838 sRGB), with min and max values generally in the 2-16% range (though few insulators other than gemstones are > 4%), while pure metals have much higher reflectance values, generally in the 70-100% range. Thus, figuring out exactly what type of material you’re representing is very important when it comes to finding the right reflectance value.
PROTIP: A metal object that is painted or coated by a different substance is considered an insulator when it comes to picking values, only where that surface has been worn off would it be metallic.
Metalness Workflow vs Specular Workflow
Before we go any further, it’s important to understand the primary differences between the metalness and specular workflows. Most game engines support one or the other; however, Toolbag 2 supports both, which allows us to compare their merits directly.
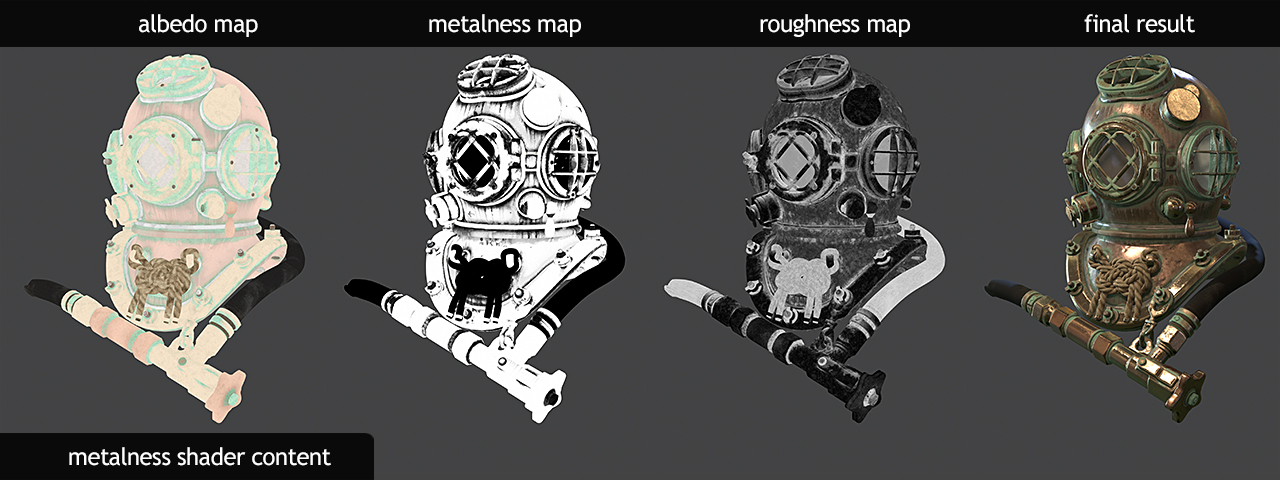
The biggest difference between the two workflows is how the diffuse and reflectivity content is defined in the texture maps. In the specular workflow, these values are set explicitly with two unique texture maps.
The metalness workflow on the other hand, uses the albedo map to define both the diffuse and reflectivity content and the metalness map to define whether the material is an insulator or a metal. The reason for this is that metals conduct electricity, which means that most photons (which are electromagnetic waves) reflect off the surface, and any photons that pass through the surface are absorbed rather than diffused, so metals typically do not have a diffuse component. Insulators on the other hand reflect a very small amount of light (~4%) and much of the of light that hits the material diffuses or bounces around the surface creating an even distribution of color.
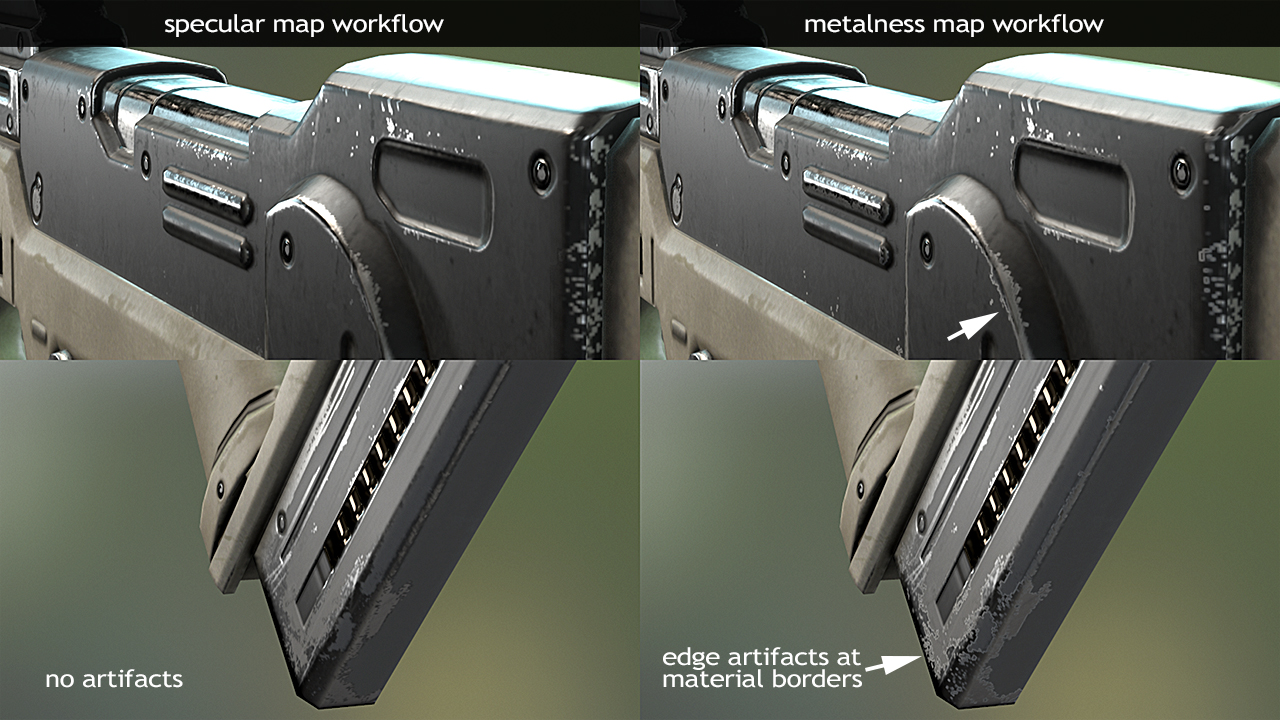
In practice, this means that much or even all (if your texture has only metals or insulators but not both) of either the diffuse or specular map will be wasted information, so the metalness workflow is usually more efficient. However, one of the drawbacks to storing both diffuse and specular content in the same texture is artifacts along material transitions.
Gloss and roughness maps define the same information, but usually on an inverse scale. With gloss maps, bright values typically define smooth/glossy surfaces, while roughness maps typically use bright values to define rough/matte surfaces. In some regions, the word glossiness is a synonymous with reflectivity, so some people think roughness is a less confusing word to use. The important thing here is not what the map is called but what the values represent, if in doubt, talk to your technical artists or engineers.
Pros of the specular workflow
- Diffusion and reflectance are set directly with two explicit inputs, which may be preferable to artists who have experience working with traditional shaders.
- More control over reflectivity for insulators is provided with a full color input.
Cons of the specular workflow
- Easy to use illogical reflectance values which gives inaccurate results.
- Uses more texture memory than the metalness workflow.
Pros of the metalness workflow
- The albedo map defines the color of the object no matter the type of material, which may be easier for artists to understand conceptually.
- Simplifies materials into two categories, insulators and metals, which may make it more difficult to author content with unrealistic texture values
- Uses less texture memory than full color specular workflow
Cons of the metalness workflow
- Material transition points cause white line artifacts
- Less control over reflectivity for insulators*
- If artists do not understand workflow, it’s easy to use illogical values in metalness map and break the system
*Some metalness workflows provide both a metalness map and a secondary specular map to control insulator reflectivity. This is not currently possible to set up in Toolbag 2.
Some people claim that the metalness workflow is easier to understand; but personally, I think it’s about even. Each workflow can be broken when artists use illogical content, and depending on your experience, one may be easier than the other to pick up. Essentially, neither method is objectively better than the other, they are simply different.
Texture Conversion: Specular -> Metalness
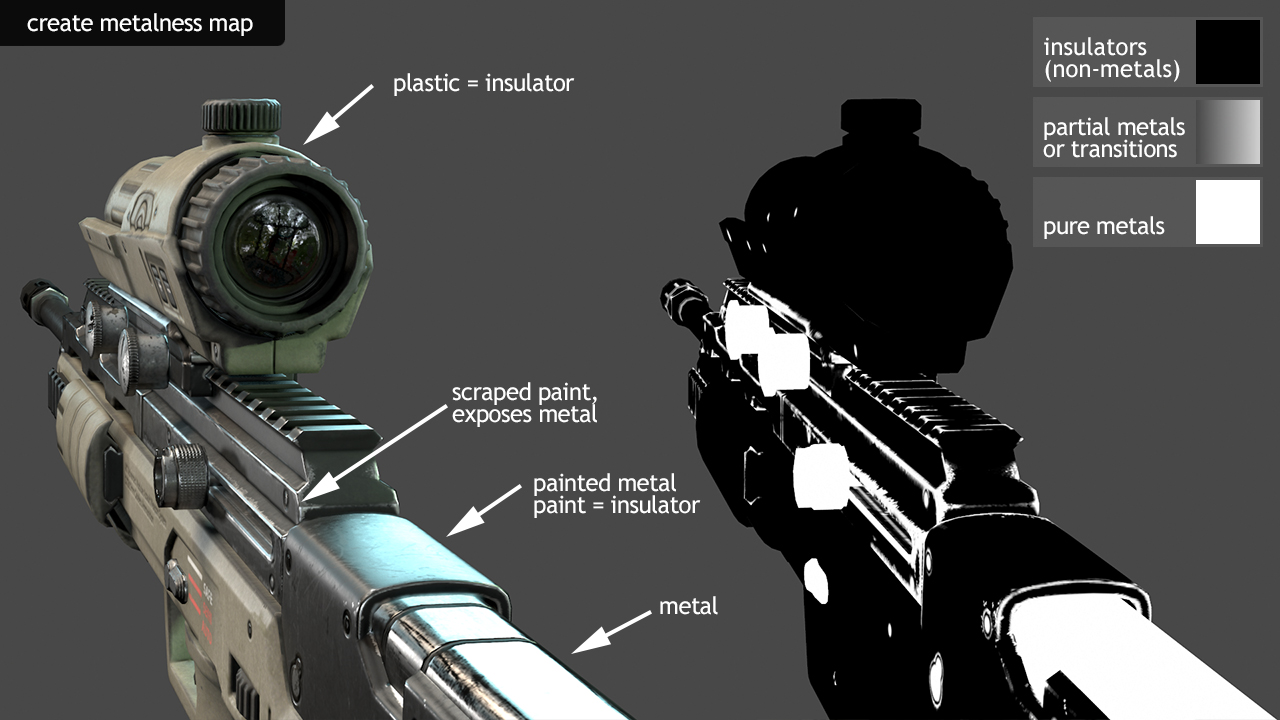
Now that we have properly calibrated content, and know the difference between the two workflows, it is actually very simple to convert the maps.
First off, create a metalness mask by assigning all of your materials either a black (non metal) or white (metal) value depending on what the surface is. If you have the PSD for your texture, this can be done quickly by using the mask content from various layers to build the metalness information. Your metalness map should be mostly white and black with gray values only for effects that have soft transitions like dirt, dust, rust, etc. Grey values can also be used for materials that partially metallic; however, these are generally quite rare. Usually, when a metal object has any sort of coating, it acts as an insulator.

Once you have your metalness map, create a new file in Photoshop and add your diffuse map as the background layer. Then, add the specular layer on top, and add a layer mask. Paste your metalness map into the specular layer’s layer mask. What you should see is the specular content where the metallic surfaces are and the diffuse content where the insulators are, which means you have a proper albedo map for the metalness workflow.
Texture Conversion: Metalness -> Specular
Converting to the specular workflow from the metalness workflow is easy as well. We simply need to split the diffuse and specular information from the albedo map into explicit diffuse and specular textures.
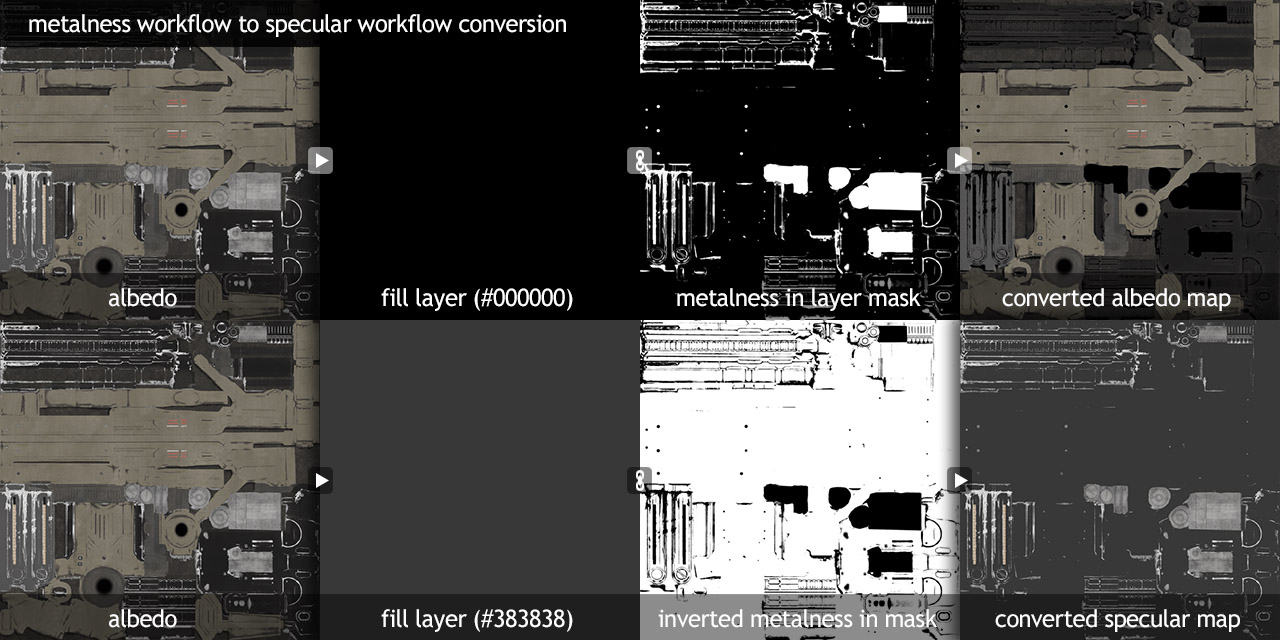
Diffuse Map
- Load your albedo map into Photoshop
- Create a new fill layer that is black (#000000)
- Paste your metalness map into the layer mask of your fill layer
Specular Map
- Make a duplicate of the original albedo map and move it above the fill layer
- Create another fill layer with a value of #383838
- Paste your metalness map into the layer mask of your fill layer
- Invert the layer mask
Comparisons and Disclaimers
Now we can compare the effectiveness of the two different conversion workflows explained above.

One thing that is important to note, because the base content was first calibrated to reasonable values, the conversion process worked very well. If your base content was not calibrated, you will see much bigger differences in the conversion. Similarly, if you’re representing certain materials, like insulators that have colored reflections (which are generally quite rare, and usually best represented with custom shaders for the typical ones like hair or iridescent materials) you will lose some information in the conversion process.
Ideally, you should create content for the target rendering system as well, and only rely on converting if you’re switching systems and updating old content or need to create content for multiple systems.
Material Logic
So what do I mean by reasonable or calibrated values? Unfortunately this is a difficult question to answer, it varies heavily depending on exactly which type of material you’re trying to represent. Instead of creating a cheat sheet, I will try to explain something I like to call material logic.
Sticking to charts and scan data can be a bit of a crutch. Firstly, you will not be able to find data for every material you wish to recreate, so you need to use some logic to decide for yourself what values are appropriate. Secondly, the surface qualities of the same material type can differ significantly depending on a variety of conditions like age, wear, finish, etc.
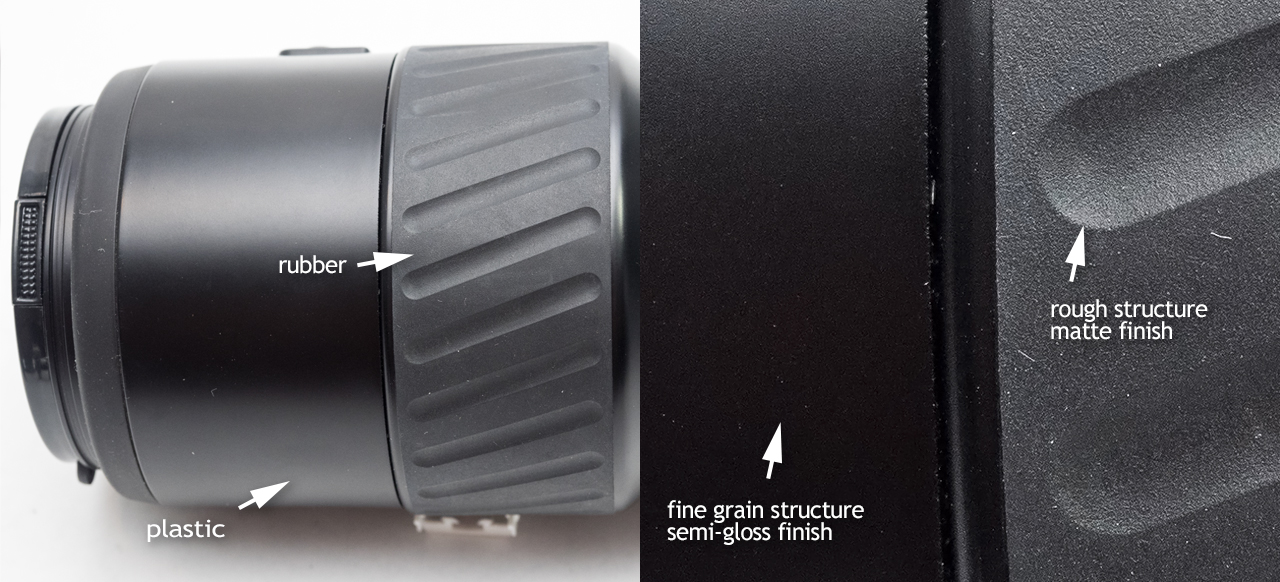
The first step is to figure out what sort of material an object is made of. For many objects this is straightforward, you can tell by simply looking at a photo that it is made of metal, plastic, rubber, etc. However, other objects may be more complex or may contain parts that are made from a variety of materials. Here, research is your friend, find reference images or similar real world objects to study, and even look into how specific objects are manufactured.
Once you know what it’s made out of, you can start to come to various conclusions. For instance, metals are much more reflective than insulators, rubber is generally rougher than plastic, concrete typically has a brighter albedo than asphalt, and so on. Most of this can be figured out through simple observation.
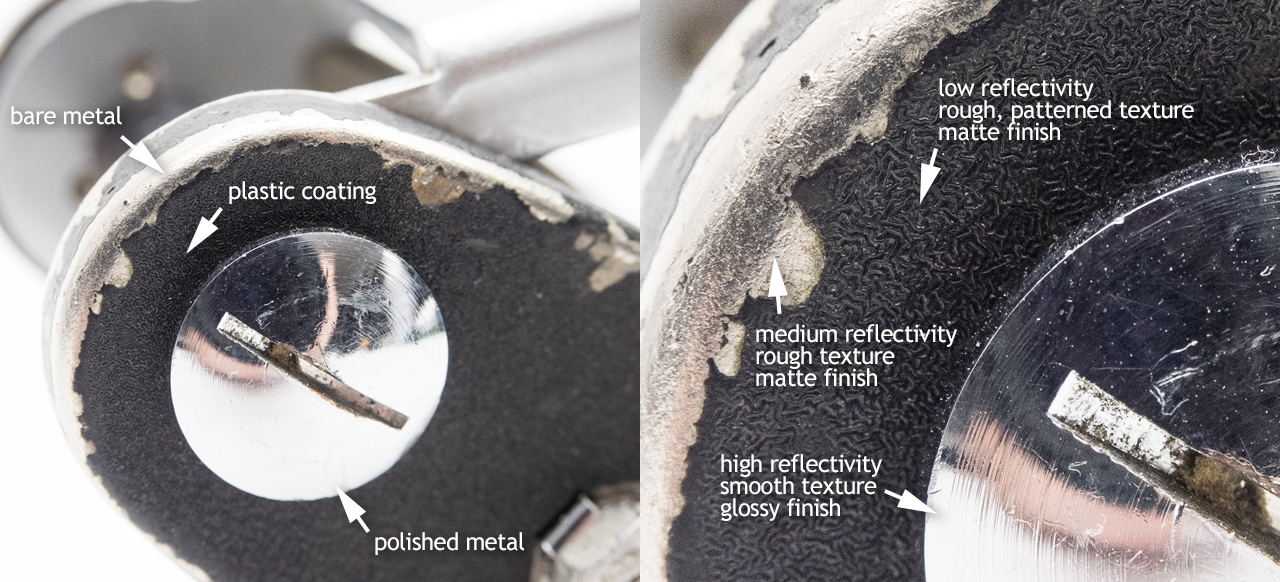
At this point, you can think more specifically about the qualities you want your texture to have. For instance, paints tend to come in a variety of different finishes from matte to glossy, plastics as well, and metals will vary quite a bit depending how polished the surface is.
In conclusion, working with a physically based rendering system requires a lot of the same artistic skills that creating game art has always relied upon, like the ability to observe and recreate materials from the world around you. It’s important to understand the underlying concepts of a PBR system; however, at the end of the day you need to trust your artistic instincts.
Further Reading
Basic Theory of Physically-Based Rendering – By Jeff Russell
Physically Based Rendering, And You Can Too! – By Joe Wilson

